A Complete Guide to Hiking the Vajolet Towers in the Dolomites

Otherworldly and breathtaking, the Vajolet Towers hike is one of the Dolomites best day hikes. This guide contains all your hiking information, essential travel tips, and plenty more.
Rising from the rocky Catinaccio mountain group that separates South Tyrol from Trentino are the six summits of the Vajolet Towers (Torri del Vajolet in Italian).
Otherworldly and breathtaking, three of the spires tower over the landscape and rifugio below like the jagged teeth of a sleeping giant, shrouded in dancing clouds and centuries-old local folklore.
While the towers are incredibly popular with rock climbers (and even the odd highline adrenaline junkie), the trail that leads to the Vajolet Towers base makes for an incredible (if not somewhat challenging) day hike in the Dolomites.
With the typically dramatic landscapes and scenery Südtirol is well-known for, without the insane crowds you’d find at other hotspots, like Tre Cime di Lavaredo, the Vajolet Towers hike is a must-see on any Dolomites itinerary.
Our friend Ben (check out his website and photography here!) recently visited Vajolet Towers on his own travels through South Tyrol, and below he shares his Torri del Vajolet hike experience, some essential tips for visiting, where to stay, and plenty more.
VAJOLET TOWERS / TORRI DEL VAJOLET HIKING GUIDE
WHERE ARE THE VAJOLET TOWERS?
The Catinaccio (Rosengarten in german) group is a concentration of pine-forested peaks in the Dolomites (between Tierser Tal and Eggental in South Tyrol and in the Fassa Valley in Trentino) that are a haven for climbers, hikers, and skiers from all over the world.
At the very heart of this stunning group of mountains are the 6 summits of the Vajolet Towers (Torri del Vajolet), the finishing point of your day hike!
HOW TO GET TO THE VAJOLET TOWERS
BY CAR
I hiked to the Vajolet Towers hike as part of my ten-day Italian Dolomites road trip and believe that the best way to get to the start of the hike is by car.
The closest city to the trailhead at Malga Frommer Alm is Bolzano (we recommend hiring a small all-wheel drive / SUV here through Rentalcars.com).
From there, take route SS12 toward Tiers. Continue past Tiers for another twenty minutes along winding mountain roads and you will reach Malga Frommer Alm.
To reach Pozza di Fassa from Bolzano, head along route SS241 for nearly an hour. SS241 turns onto route SS48, which will lead you to the Pozza di Fassa region and the town of Pera.
BOOK | Search for car rental options in Bolzano here.
BY BUS
For information on how to reach the trailhead at Malga Frommer Alm by bus, check directions on Moovit here.
Alternatively, if you plan on taking route three and starting the hike from the cable car at Pera in Pozza di Fassa, check directions to Val di Fossa on Moovit here.
HOW TO HIKE THE TORRI DEL VAJOLET TRAIL
The Vajolet Towers hike is an incredible day hike in the Dolomites, home to the typical dramatic landscapes and scenery the area is known for, without the insane crowds you’d find at other hotspots, like Tre Cime di Lavaredo.
With multiple routes to reach these stunning mountain peaks, the hike to the Vajolet Towers is an absolute must on any traveller’s itinerary.
All three hiking routes are outlined below - and note, each requires a decent level of fitness and mobility.
VAJOLET TOWERS HIKING ROUTE #1
FROM THE TRAILHEAD AT MALGA FROMMER ALM VIA PAS DE LE CORONELLE
The trailhead begins at Malga Frommer Alm, a restaurant and chairlift-serviced area with a roadside car park in South Tyrol.
From the carpark, you have two options. The first is to take the König Laurin chairlift from the carpark up to Rifugio Fronza, where you can begin the hike in earnest.
The second is to hike the path from the carpark up to Rifugio Fronza on foot. This second option will add about two hours of steep incline along clearly marked paths that switchback their way up the mountain and through some small alpine forests to Rifugio Fronza.
When I did this hike, I went with the first option and paid €10 for a one-way ticket on the König Laurin chairlift up to Rifugio Fronza, and then hiked down the mountain at the end of the day. Alternatively, you can pay € 14 for a return ticket.
From Rifugio Fronza, sometimes called the Rosengarten Hütte, the hike begins behind the building on trail number 550. The trail is initially steep, with some rock scrambling required (there are ropes in place in some sections for assistance).
Before long, you will come to a fork in the path, the way left leads to Via Ferrata Passo Santner, which I will cover in the next section, and the way right leads to Pas de le Coronelle, which is the easier option and the route we will cover here.
From the fork, take the right-hand path along the edge of the mountain toward Pas de le Coronelle. The path is well marked, and you just have to follow the red markings painted on rocks along the way.
Before long the path will start to steepen as you make your way up to Pas de le Coronelle. You’ll know you’re close to the top when you reach some wooden steps. Take a rest at the top, 2630 metres above sea level, and enjoy the view, you’ve earned it!
Once you’re ready to go, take Trail 541 down the mountain. It starts off steep along a gravelly scree trail but will eventually level out and lead you to Rifugio Vajolet. This is a great place for lunch, with two mountain huts that serve food, coffee, and drinks, plus a big grassy area to rest and relax on if you bring your own picnic. You can also see the towers from here, and the view is incredible, be sure to snap some beautiful pictures while you rest!
From Rifugio Vajolet, there is one last push needed to reach the Vajolet Towers themselves. You’ll see the path leading up to the base of the towers, it’s about 400 metres up a steep rock scramble section. It’s not very technical or difficult, but you do need to be reasonably fit. Again, just follow the red markings and you can’t go wrong.
Eventually, you’ll reach Rifugio Alberto and the base of the Vajolet Towers. Congratulations! Enjoy the views, enjoy a drink at Rifugio Alberto, and generally bask in the glory of the Rosengarten Mountains.
The Vajolet Towers are one of the most popular rock-climbing destinations in the Dolomites, so chances are you’ll see people dangling off them or at their summit.
After you’ve had your fill of the crisp mountain air and stunning views, you can make your way back along the same route to the carpark or follow one of the other routes outlined in this blog post.
Alternatively, the mountain huts you encounter along the way also offer accommodation so you can spend the night in the mountains and head back the next day.
It’s completely up to you!

The peaks of the Vajolet Towers in the Dolomites | Image credit - Ben Lawrence
VAJOLET TOWERS HIKING ROUTE #2
FROM THE TRAILHEAD AT MALGA FROMMER ALM VIA VIA FERRATA PASSO SANTNER
The second route to the Vajolet Towers begins the same as the first.
Park at the roadside carpark at the trailhead at Malga Frommer Alm. From there, either pay for the König Laurin chairlift to take you up to Rifugio Fronza (€ 10 one way or € 14 return) or hike for about two hours up the mountain to Rifugio Fronza/the Rosengarten Hütte instead.
From behind the Rosengarten hütte, take hiking trail 550 and make your way to the fork in the road outlined earlier. This time, we’ll be covering the route to the left via Via Ferrata Passo Santner.
Take the left-hand path at the fork and make your way along the mountainside, following the red markings. After about 20-30 minutes, you will reach the start of the Via Ferrata Passo Santner. Via ferrata just means ‘climbing route’, and there are many of them with varying difficulties all through the Dolomites.
For added safety, you can take harnesses and helmets with you, which is definitely recommended. However, I did this route free solo (without climbing equipment) because I am physically fit and have experience and confidence in rock climbing and scrambling.
If you are uncomfortable with heights, don’t feel confident with rock scrambling, or are generally unsure, either hire the safety equipment or take one of the other routes outlined in this blog post.
Via Ferrata Passo Santner is a good challenge for those looking for a little more adventure in their hike. It can get technical in some sections, with rock climbing, scrambling, and the use of ladders and ropes needed to make it to the top of the pass. After the climb, you’ll reach Rifugio Passo Santner at 2734 metres elevation. You can stop here for a break and to enjoy the views or walk just a little further down to Rifugio Alberto and the base of the Vajolet Towers.
To get there, go to the big cross just behind Rifugio Passo Santner, from there you can easily see the towers and Rifugio Alberto.
Again, after enjoying all that the Vajolet Towers has to offer, you can stay at one of the huts or make your way back to your car along whichever route you wish!
TORRI DEL VAJOLET HIKING ROUTE #3
FROM THE TOWN OF PERA, IN THE POZZA DI FASSA REGION
The third route is probably the easiest of the three, as the chairlift from the town of Pera, located in the Pozza di Fassa region, takes you closer to the towers than the cable car at Malga Frommer Alm.
From Pera, take the Vajolet one and two chairlifts. They cost €5 each for a one-way ticket or €8 each for a return ticket. If you purchase both at the same time, it will cost you € 16 return. Or, you can hike from Pera for about two hours up the mountain to where the cable car would drop you, the choice is yours.
From the end of the Vajolet two chairlift, follow the easily visible trail to the right that leads up the mountain. You’ll hike through some beautiful sections of alpine forest, with stunning views of the surrounding mountains that make up the Rosengarten Group along the way.
Eventually, you’ll come to two huts that are fenced off. To the right of these huts is a mountain water trough where you can fill up your water, and the path just to the left of that leads up to Rifugio Gardeccia. Rifugio Gardeccia is a great place to stop for a decent rest, with two huts that offer food and drinks, plus a large grassy area where you can enjoy a picnic and gaze at the mountains around you. You can even see Pas de la Coronelle from here.
Once you’re rested, it’s about a 45-minute climb up some steep gravel roads to Rifugio Vajolet. You can choose to rest here again or continue the climb straight away up the 400 metres to Rifugio Alberto as outlined in route one.
And that’s it; the three main routes to reach the Vajolet Towers right at the heart of the Rosengarten Group in the Dolomites, Italy.

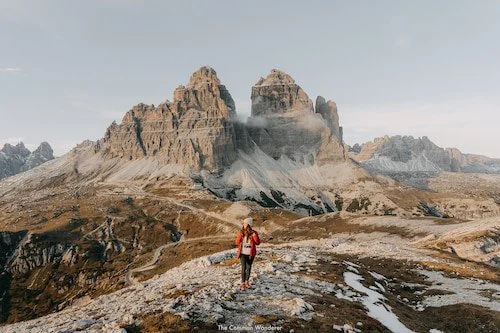
A typical alpine scene in the Dolomites near the Vajolet Towers | Image credit - Ben Lawrence
THINGS TO KNOW BEFORE HIKING VAJOLET TOWERS
OPENING HOURS
The hike is technically open at all times, depending on the weather of course (see below).
However, please keep in mind that some of this hike requires climbing and scrambling at high altitudes, regardless of which route you take, so keep that in mind before taking off in the dark.
The chair lift services run from 8 am to 5:30 pm, so if you plan on coming back down the mountain on the chair lift, be sure to arrive back in time.
COST OF THE TORRI DEL VAJOLET HIKE
The hike itself is completely free. However, if you choose to go via chair lift on any of the routes, you will have to pay a small fee.
König Laurin chairlift from Malga Frommer Alm | € 10 one way, or € 14 return
Vajolet one chairlift from Pozza di Fassa | € 5 one-way or €8 return
Vajolet two chairlift from Pozza di Fassa | € 5 one-way or €8 return
FACILITIES AT THE VAJOLET TOWERS
Along all three routes, you will find mountain huts, known locally as rifugios, where you can stop for coffee, food, or even a beer.
Water is pretty scarce around the Vajolet Towers, so don’t expect mountain huts to have an endless supply of drinking water.
Instead, bring along reusable water filtration and purification bottles (we use the Grayl) to avoid having to buy bottled water from the huts.
On all three routes, some sections require some form of rock climbing or scrambling. There are ropes and markers in all of these sections, so you just need to follow them to keep from getting lost.
DURATION OF THE VAJOLET TOWER HIKES
Routes one and two are similar in length, roughly 8km return, while route three is slightly shorter, roughly 6-7 km, thanks to the longer chairlift ride.
The hike should take you between 4-6 hours to return, depending on which route you take, how quickly you walk, and how long you stop for breaks!
ALWAYS CHECK THE WEATHER
As with any hike, it’s important to factor in the weather, but particularly here due to the altitudes you reach, and the rock scrambling sections.
Even in the warmer months, there is the possibility of snow around the towers, while the via ferrata sections could be extremely dangerous if conditions aren’t favourable.
Always check the weather before you go and be sure to bring some extra layers in case of emergency.
BRING APPROPRIATE EQUIPMENT
All hiking requires a few essential bits of gear. Decent shoes, a refillable water bottle, a backpack for camera gear and snacks, plus appropriate clothing.
If you opt for route two and go up Via Ferrata Passo Santner, then there is some additional gear you might want to consider.
You can hire ropes, harness, and climbing helmet from the adventure centres throughout the Dolomites, and you should definitely hire this equipment if you’re an inexperienced scrambler or don’t feel confident at heights. Alternatively, take one of the other routes and you won’t need to worry about the extra gear!
WHAT TO PACK FOR YOUR VAJOLET TOWERS HIKE
Although the Vajolet Towers hike is fairly easy, there are a few essentials we suggest you take, to help keep you safe, hydrated and nourished.
Reusable water bottle | There is no need for a modern traveller to buy bottled water, ever. Purchase a water filtration + purification bottle (like our faves from The Grayl) and you will literally never need to purchase bottled water again.
BUY | We use the Grayl GEOPRESS every day, every trip we take!
Sturdy hiking boots | We’re obsessed with our Danner boots (Mim has the Mountain Light Cascades, while Mark has the Mens Mountain 600s), and definitely recommend them for any hiking you’re doing in the Dolomites.
They’re pricey, but built to last, super sturdy, comfy right out of the box, and we love them a ridiculous amount
Wet weather gear | Even in summer, the Dolomites are known to have some extreme weather conditions, including rainfall (especially in the afternoons). Due to this, we recommend packing some wet weather gear, including a Gore-Tex jacket, just in case.
WHEN TO VISIT VAJOLET TOWERS
THE BEST TIME OF YEAR
The summer months, late June through to August, are best if you’re after good weather and plenty of colour.
The fields and forests are bursting with colourful wildflowers, particularly in Spring, while in Autumn the trees begin to shed their leaves and the forests are turned all colours of yellow and copper.
You can do the hike during the winter months, December through to April, but the chances of snow on the paths is very high which is something you need to account for.
I did the hike at the start of Autumn and there was still some snow along the hike but the weather was mostly clear and warm.
THE BEST TIME OF DAY
The Vajolet Towers are gorgeous at sunrise, however, the best way to see them at this time would be to stay the night at Rifugio Alberto, right at the base of the towers.
Otherwise, the hike is a great way to spend a morning or afternoon, or even a whole day affair if you want to spend longer at each of the huts.
WHERE TO STAY NEAR THE VAJOLET TOWERS
Looking for where to stay in the Dolomites? We’ve written a huge guide on where to stay in the Dolomites (it’s seriously huge!).
From luxury hotels to airbnbs, our guide has your Dolomites accommodation well and truly sorted.
There are a few places you could base yourself for the Vajolet Towers hike, these are our fave options:
STAY OVERNIGHT AT RIFUGIO ALBERTO
If you’ve got a little more time spare, we’d recommend staying overnight at Rifugio Alberto to make the most of your mountain experience. There really is nothing quite like spending the night at a traditional chalet in the mountains and Rifugio Alberto is definitely no exception!
Rooms here vary from medium, large, and dorm-size, all with bunk beds (so you’ll be sharing with others), and are charged either with breakfast or half-board meals. The restaurant is cosy, and perfect for a refreshing beer and a hearty mountain meal as well as making new friends with fellow mountain lovers
What’s more, spending the night will allow you to see the famous enrosadira, or ‘turning pink’, of the surrounding peaks at dawn and dusk - a natural phenomenon super unique to the Dolomites caused by the sunlight illuminating the minerals in the mountain rock.
The burning dolomites are a pretty magical sight to witness, and definitely worth spending the extra night here for.
Note | The rifugio is only open in summer, from June - October, and you’ll need to contact them in advance to book your stay.
NOVA LEVANTE
We’d recommend basing yourself in Nova Levante / Welschnofen (an 18-minute drive from Malga Frommeralm).
HOTEL | We stayed at Hotel Stella Stern in Nova Levante, a gorgeous traditional-style B+B, with large rooms overlooking the mountains, a super comfy reading area, and a well-stocked breakfast buffet (Mim’s fave!).
BOOK | Check prices and availability for Hotel Stella Stern here
CAREZZA / KARERSEE
Alternatively, you could also base yourself in Carezza, near Lago di Carezza.
HOTEL | Our recommendation is the sleek and modern Sporthotel Alpenrose, nestled in the foothills of the Catinaccio and Latemar Mountains. Expect friendly staff, great food, easy hiking and skiing access, and a wellness centre made of dreams — including an indoor/outdoor pool with epic views over the mountains beyond.
BOOK | Sporthotel Alpenrose
TRAVEL INSURANCE | STAY SAFE IN THE DOLOMITES
If you can't afford travel insurance, you really can't afford to travel. As the current global situation has taught many people, things can go wrong anywhere in the world - and insurance is often the only way of mitigating any issues with minimal expense or stress for you.
Here are our recommendations, based on 8+ years of full-time travel:
FOR TRAVELLERS | HeyMondo - COVID-19 coverage, comprehensive travel + medical insurance, an app with 24-hour medical support, and no out-of-pocket fees. *Get 5% off your policy by booking through our link here.
FOR DIGITAL NOMADS | SafetyWing - COVID-19 coverage, comprehensive travel & medical, and policies can be purchased while already abroad.
CAR INSURANCE | Insurance4CarHire - a great annual car insurance policy
PLANNING A TRIP TO ITALY SOON?
Check out these essential posts to help you have the best trip ever:
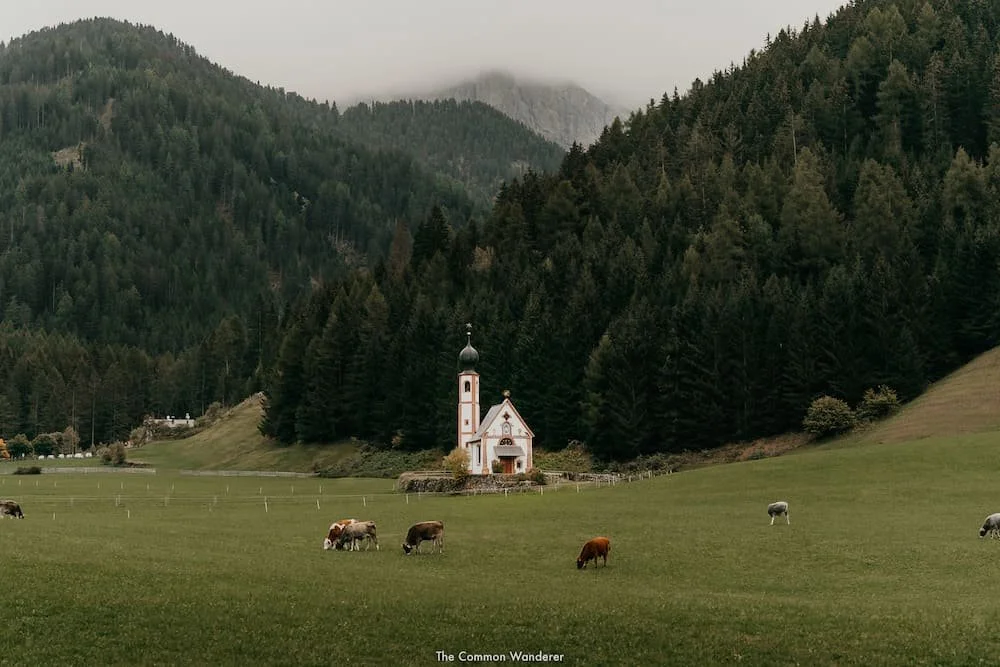
DOLOMITES | Top things to do in the Dolomites, Our 7-day road trip itinerary for the Dolomites, where to stay in the Dolomites, how to get to the Dolomites, and A Guide to Val di Funes
HIKES TO REMEMBER | 7 of the best day hikes in the Dolomites, including the famous Tre Cime De Lavaredo loop, Lago di Sorapis, Cadini di Misurina
SOUTH TYROL | 19 amazing things to do in South Tyrol during Summer, plus everything we love about the beautiful South Tyrol region
THE LAKES OF THE DOLOMITES | How to visit Lago di Carezza, our guide to Lago di Braies, and Lago di Sorapis
PHOTOGRAPHY | Love our photography? Grab the presets we use on every photo here
RESPONSIBLE TRAVEL | Responsible travel is important. REALLY IMPORTANT. Learn our top responsible travel tips to help you, your family and friends travel more consciously around the globe
ECO-FRIENDLY PACKING ESSENTIALS | Don’t leave home without our favourite eco-friendly travel essentials